Every time you unlock your phone with your face, a machine has looked at you, understood what it saw, and made a decision — all in under a second. That is computer vision at work, and it is one of the most exam-important topics in CBSE AI for both Class 10 (Unit 5) and Class 12 (Unit 3).
What You Will Learn in This Guide
- How computers “see” images using pixels, RGB values, and grayscale
- The full computer vision process — from image capture to final output
- What CNNs are and why they matter for Class 10 and Class 12 exams
- The convolution operator and how it extracts features from images
- Real-world applications of computer vision in India and globally
- How to attempt 2-mark and 6-mark CV questions with confidence
- CBSE-specified hands-on activities to strengthen your practical file
Section 1: What Is Computer Vision?
Computer vision is a field of Artificial Intelligence that enables machines to interpret and understand visual information from the world — images, videos, and live camera feeds — the same way humans use their eyes and brain.
When you look at a photograph of the Taj Mahal, your brain instantly recognises the building, its colour, its shape, and its context. You do this without any conscious effort because your visual system has been trained over years of experience.
A computer has no such built-in ability. It sees an image as nothing more than a grid of numbers. Computer vision is the science of teaching machines to find meaning in those numbers.
Simple definition for your exam: Computer vision is the ability of a computer to identify and process images and videos the same way human vision does.
Section 2: How Machines See — The Basics of Digital Images
Before a computer can “understand” an image, it must first represent the image in a form it can process: numbers.
Pixels — The Building Blocks of Every Image
A pixel (short for picture element) is the smallest unit of a digital image. Every image you see on a screen is made up of thousands — sometimes millions — of tiny coloured dots called pixels.
When you look at a photograph up close on a screen, you can sometimes see these individual squares. That is the pixel grid.
Resolution refers to the total number of pixels in an image. A 1920×1080 image contains 1,920 pixels across and 1,080 pixels down — over 2 million pixels in total. Higher resolution means more detail, but also more data for a computer to process.
Pixel Values — How Colour Is Stored as Numbers
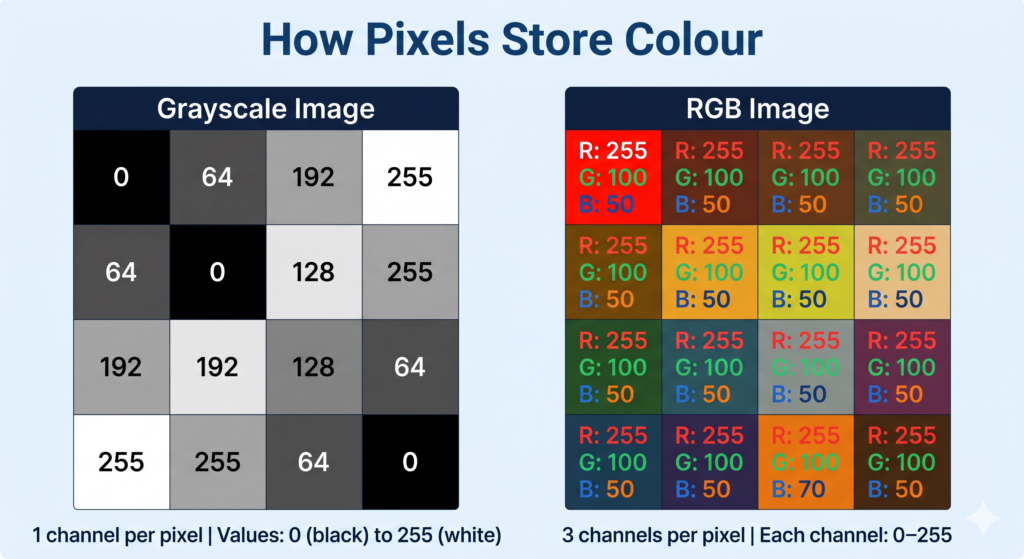
Each pixel stores its colour as a number or a set of numbers called pixel values.
Grayscale Images
In a grayscale image, each pixel has a single value between 0 and 255:
- 0 = pure black
- 255 = pure white
- Values in between = shades of grey
A grayscale image of 100×100 pixels contains 10,000 numbers — one per pixel.
RGB Images
Most real-world images are in colour. Colour images use the RGB model, where every pixel stores three values — one each for:
- R — Red (0–255)
- G — Green (0–255)
- B — Blue (0–255)
By combining different intensities of red, green, and blue, any colour can be represented.
Examples:
| Colour | R | G | B |
|---|---|---|---|
| Pure Red | 255 | 0 | 0 |
| Pure Green | 0 | 255 | 0 |
| Pure Blue | 0 | 0 | 255 |
| White | 255 | 255 | 255 |
| Black | 0 | 0 | 0 |
| Orange | 255 | 165 | 0 |
A colour image of 100×100 pixels contains 30,000 numbers (100 × 100 × 3 channels). This is why even small colour images contain a large amount of data.
🎯 Class 12 Callout — Binary Art Activity (Unit 3)
Your CBSE Class 12 syllabus includes a specific practical activity: Binary Art — Recreating Images with 0s and 1s.
What this activity teaches: At the most fundamental level, computers store images as binary (0s and 1s). A black-and-white image can be represented as a grid where 0 = white pixel and 1 = black pixel. By filling in this grid, you recreate a simple image using binary notation.
How to do it:
- Take a simple 8×8 or 16×16 grid on paper.
- Assign 0 to empty (white) cells and 1 to filled (black) cells.
- Fill in a pattern — a letter, a shape, or a simple symbol.
- Read out the binary row-by-row — this is how a computer stores that image.
Why it matters for your exam: Questions often ask you to explain how images are stored digitally. This activity gives you a concrete, examinable answer: “Images are stored as grids of numerical values; in a binary image, each pixel is represented by a 0 or 1.”
Document it for your practical file: Photograph your completed grid and write a 2–3 sentence explanation of what each row of 0s and 1s represents.
🎯 Class 10 Callout — Image Basics (Unit 5)
Your CBSE Class 10 syllabus covers: pixels, resolution, pixel values, grayscale images, and RGB images as core theory. These concepts appear in both theory questions and practical activities. Be comfortable explaining what a pixel is, what a pixel value represents, and the difference between grayscale (1 channel, 0–255) and RGB (3 channels, 0–255 each).
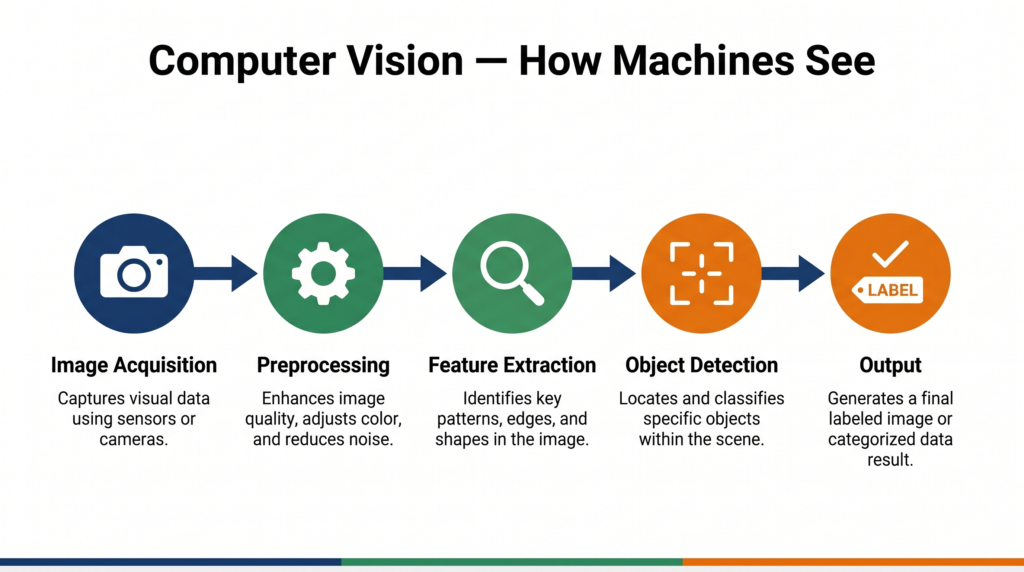
Section 3: The Computer Vision Process — Step by Step
Computer vision does not happen in one step. There is a clear process a machine follows every time it analyses a visual input. Understanding this process is essential for your CBSE exams.

Step 1: Image Acquisition
The process begins with capturing a visual input — from a camera, a scanner, a satellite, or a stored image file. The quality of this input directly affects everything that follows.
Step 2: Image Preprocessing
Raw images are rarely perfect. They may be blurry, poorly lit, or contain noise (random pixel distortions). Preprocessing cleans and standardises the image so the computer can process it more reliably.
Common preprocessing steps include:
- Resizing — standardising image dimensions
- Noise reduction — smoothing out random pixel variations
- Normalisation — scaling pixel values to a consistent range
- Grayscale conversion — converting RGB to grayscale when colour is not needed
Step 3: Feature Extraction
This is the most critical step. Features are distinctive patterns in an image — edges, corners, textures, shapes — that help identify what the image contains.
For a face detection system, features might include the edges of a nose, the curve of an eyebrow, or the spacing between eyes.
Traditional computer vision algorithms required engineers to manually design these features. Modern deep learning systems (CNNs) learn features automatically from training data.
Step 4: Object Detection / Recognition / Segmentation
With features extracted, the computer can now perform higher-level tasks:
- Classification — What is in this image? (e.g., dog or cat)
- Object detection — Where exactly is the object? (locates with a bounding box)
- Segmentation — Which pixels belong to which object? (pixel-level labelling)
Step 5: Analysis and Output
The computer produces a result — a label, a bounding box, a count, an alert — based on what it has understood about the visual input.
The complete flow: Image Acquisition → Preprocessing → Feature Extraction → Detection/Recognition → Analysis & Output
🎯 Class 12 Callout — Computer Vision Process (Unit 3)
The Class 12 syllabus explicitly lists the “Computer Vision Process” as a learning outcome. Expect 4-mark or 6-mark questions asking you to describe the stages. Use the five-step process above with brief explanations for each stage. A full 6-mark answer should define each step and give one example per step.
Section 4: Computer Vision Tasks
Computer vision is not a single task — it is a family of related tasks, each with different goals.
| Task | What It Does | Example |
|---|---|---|
| Image Classification | Assigns a single label to an entire image | “This is a picture of a cat” |
| Object Detection | Finds and locates multiple objects within an image | “There are 2 people and 1 car in this image, here are their positions” |
| Image Segmentation | Labels every pixel — assigns each to an object class | Used in medical scans to identify tumour boundaries |
| Facial Recognition | Identifies or verifies a person from a face image | DigiYatra airport boarding system |
| Optical Character Recognition (OCR) | Extracts text from images | Scanning a printed document to editable text |
| Pose Estimation | Detects the position of body joints in a person | Sports coaching apps, physical therapy |
Section 5: The Convolution Operator — How Machines Extract Features
The convolution operator is the mathematical engine behind modern image processing and CNNs. Class 10 students study it as a core topic; Class 12 students need it to understand CNN architecture.
What Is Convolution?
A convolution is a mathematical operation that applies a small grid of numbers — called a kernel or filter — across an image to detect specific features.
Think of the kernel as a small “detector” that slides across every part of the image, one step at a time, and asks: “Does this pattern exist here?”
How It Works
- A kernel (e.g., a 3×3 grid of numbers) is placed over a small section of the image.
- Each pixel value in that section is multiplied by the corresponding kernel value.
- All the products are summed to produce a single output number.
- The kernel slides (by a step called the stride) to the next position and repeats.
- The result is a new grid of numbers called a feature map — which highlights where that feature appears in the image.
Example — Edge Detection Kernel:
-1  -1  -1
-1   8  -1
-1  -1  -1
This kernel produces high output values wherever there is a sharp boundary between a dark and a light area — in other words, it detects edges.
Different kernels detect different features: edges, curves, blobs, textures, and more.
🔬 Try it yourself: Visit http://setosa.io/ev/image-kernels/ — an interactive tool specified in your CBSE Class 10 syllabus. Move the slider to see how different kernels change the same image in real time. This is an excellent addition to your practical file.
Section 6: Convolutional Neural Networks (CNN) — The Brain Behind Computer Vision
A Convolutional Neural Network (CNN) is a type of deep learning model specifically designed to process visual data. It is the technology behind face unlock on smartphones, self-driving car cameras, and medical imaging systems.
Why CNNs — and Not Regular Neural Networks?
A regular neural network treats every pixel as an independent input. For a 224×224 colour image, that is 150,528 inputs — and the connections multiply exponentially. This is computationally impractical.
CNNs solve this by exploiting a key insight: nearby pixels are related to each other. Patterns like edges and shapes are local — they don’t depend on pixels far away. CNNs use convolution to capture this local structure efficiently.
If you want to understand how neural networks work in depth before diving into CNNs, see our complete guide to neural networks.
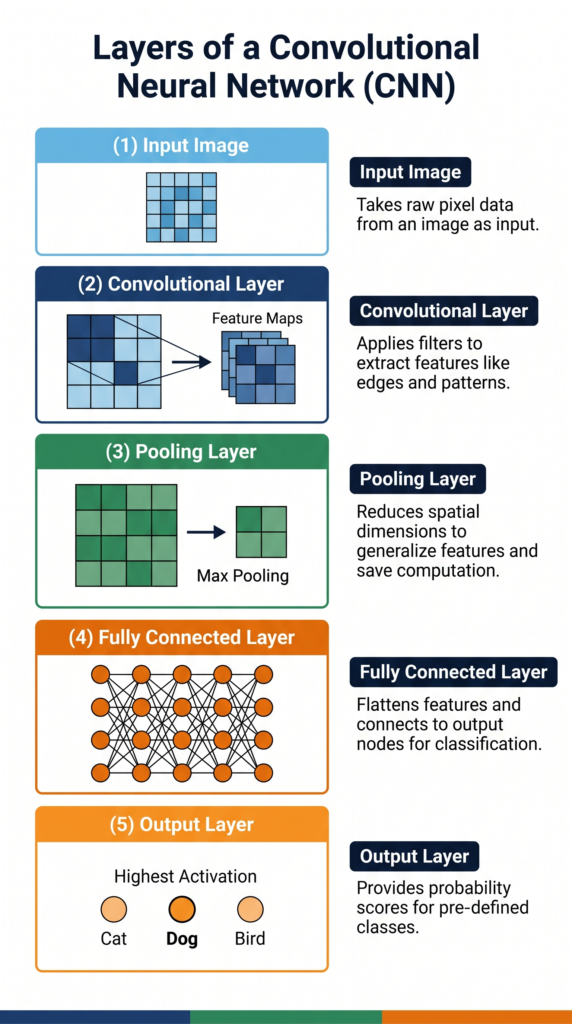
The Architecture of a CNN
A CNN consists of multiple types of layers, each with a specific role:
1. Convolutional Layer
The core layer. Applies multiple kernels to the input image to produce multiple feature maps. Early layers detect simple features (edges, lines); deeper layers detect complex features (eyes, wheels, text).
2. Activation Function (ReLU)
After each convolution, a ReLU (Rectified Linear Unit) activation function is applied. It replaces all negative values in the feature map with zero. This introduces non-linearity — essential for learning complex patterns.
3. Pooling Layer
Pooling reduces the size of feature maps while retaining the most important information. Max pooling is most common — it takes the highest value from each small region of the feature map.
Benefits of pooling: smaller data size, reduced computation, and resistance to small variations in the image position.
4. Fully Connected Layer
After several rounds of convolution and pooling, the feature maps are flattened into a single long list of numbers and fed into a standard fully connected neural network. This layer combines all the extracted features to make the final classification decision.
5. Output Layer
The final layer outputs a probability for each possible class. The class with the highest probability is the CNN’s prediction.
CNN architecture summary: Input Image → [Conv → ReLU → Pooling] × N → Flatten → Fully Connected → Output
🎯 Class 10 Callout — CNN (Unit 5)
Your Class 10 syllabus covers: CNN architecture, kernel, layers, and applications. You are expected to understand what a CNN is, name its layers, and explain what each layer does. The typical exam question is: “Explain the layers of a CNN with a diagram.” Learn the five layers above and be able to write 2–3 lines on each.
🎯 Class 12 Callout — CNN and Computer Vision (Unit 3)
Class 12 goes deeper. You need to link CNN architecture to the broader computer vision process — explain why CNNs are used for computer vision (local patterns, shared weights, fewer parameters than regular NNs). You may also be asked about working with OpenCV in the context of a practical project (see Section 9 below).
Section 7: No-Code AI Tools for Computer Vision (Class 10)
Your CBSE Class 10 syllabus includes hands-on work with no-code tools for computer vision. These tools let you build and deploy a working CV model without writing a single line of code — and they can become part of your practical file.
Teachable Machine (Google)
Link: https://teachablemachine.withgoogle.com/
A free, browser-based tool by Google. You collect examples from your webcam, train a model in seconds, and see real-time predictions. Ideal for image classification projects.
How to use for your practical file:
- Open Teachable Machine and select “Image Project.”
- Create two or three classes (e.g., “Mask” / “No Mask” or “Thumbs Up” / “Thumbs Down”).
- Use your webcam to collect 30–50 images per class.
- Click “Train Model” and observe the training progress.
- Test the model live with your webcam and take a screenshot of the prediction output.
- Click “Export Model” to deploy it.
Lobe.ai (Microsoft)
Link: https://www.lobe.ai/
A desktop application by Microsoft. You label images, Lobe trains a model locally on your computer, and you can export it for deployment. Good for offline use.
Orange Data Mining — Image Analytics
Link: https://orangedatamining.com/
The Orange tool your Class 10 and Class 12 curriculum already uses for data projects also has an Image Analytics add-on that supports computer vision workflows — importing images, extracting features, and classifying them visually using drag-and-drop widgets.
For a complete walkthrough of Orange Data Mining, visit our Orange Data Mining tutorial.
Section 8: Real-World Applications of Computer Vision in India and Globally
Computer vision is not a future technology — it is embedded in systems Indians use every day.
1. DigiYatra — Facial Recognition at Indian Airports
India’s DigiYatra programme uses facial recognition to allow passengers to board flights without showing a physical boarding pass. Your face is your boarding pass. The system compares your live face against your registered photograph using computer vision.
This application also raises important ethical questions around privacy and consent — a topic your CBSE syllabus addresses in Class 10 and Class 12.
2. Agriculture — Crop Disease Detection
Startups like Cropin and projects supported by ICAR use computer vision to analyse drone and smartphone photographs of crops. By detecting colour changes, leaf patterns, and texture anomalies, these systems identify diseases like wheat blast or rice blast days before they are visible to the naked eye — giving farmers time to act.
3. Healthcare — Medical Imaging Analysis
Hospitals across India use AI-powered CV tools to analyse X-rays, CT scans, and MRIs. Systems trained on thousands of labelled scans can flag potential tuberculosis lesions in chest X-rays with accuracy comparable to trained radiologists — and at a fraction of the time and cost.
4. ISRO — Satellite Image Analysis
The Indian Space Research Organisation uses computer vision to analyse satellite imagery for applications including flood mapping, deforestation monitoring, urban expansion tracking, and disaster assessment after events like the Uttarakhand floods.
Section 9: Challenges and the Future of Computer Vision
Current Challenges
1. Privacy and Ethical Concerns Facial recognition systems can be misused for mass surveillance without consent. The balance between security applications and individual privacy is an active policy debate in India and globally.
2. Bias in Training Data A CV model trained primarily on images from one demographic group may perform poorly on others. For example, early facial recognition systems showed significantly lower accuracy for darker skin tones — a direct consequence of biased training datasets.
3. Lighting and Environmental Variation Real-world conditions are unpredictable. A model trained on well-lit images may fail in low light, fog, or rain. This is a critical challenge for autonomous vehicles.
4. Adversarial Attacks Small, carefully crafted changes to an image — invisible to the human eye — can fool a CV system into making a completely wrong prediction. This is a serious security concern for safety-critical applications.
5. Computational Cost Training large CV models requires enormous computational resources and energy. Running them on edge devices (like smartphones or embedded cameras) requires careful model optimisation.
The Future of Computer Vision
- Vision transformers — a new architecture replacing CNNs in some tasks, with improved accuracy on large datasets
- 3D computer vision — understanding depth and three-dimensional structure, critical for robotics and AR
- Edge AI — running CV models directly on cameras and IoT devices without sending data to the cloud
- Multi-modal AI — combining vision with language (e.g., “describe what you see in this image”) as seen in systems like GPT-4V and Google Gemini
⚠️ For Advanced Learners — Working with OpenCV (Class 12 only)
Note: This section is marked “For Advanced Learners” in the CBSE Class 12 syllabus (2025–26) and is NOT evaluated in Theory or Practical Examinations. It is included here for students who wish to explore beyond the syllabus.
OpenCV (Open Source Computer Vision Library) is the most widely used Python library for computer vision tasks. It allows you to load, display, resize, and transform images programmatically.
Basic operations your Class 12 syllabus mentions:
- Loading an image:
cv2.imread('image.jpg')- Displaying an image:
cv2.imshow('Window', image)- Resizing an image:
cv2.resize(image, (width, height))- Converting to grayscale:
cv2.cvtColor(image, cv2.COLOR_BGR2GRAY)OpenCV skills are directly useful if you build a computer vision Capstone Project — for example, a face mask detection system or a hand gesture recogniser.
For a deeper understanding of neural networks that power these projects, see our neural networks and deep learning guide.
Section 10: Key Differences and Comparison Table
| Concept | Grayscale Image | RGB Image |
|---|---|---|
| Channels | 1 | 3 (R, G, B) |
| Pixel value range | 0–255 | 0–255 per channel |
| Data size | Smaller | 3× larger |
| Used for | Simplicity, edge detection | Real-world colour images |
| Concept | Traditional CV | Deep Learning (CNN) |
|---|---|---|
| Feature extraction | Manual (engineer-designed) | Automatic (learned from data) |
| Accuracy on complex tasks | Lower | Higher |
| Data requirement | Lower | Large datasets needed |
| Interpretability | Easier to interpret | Harder (black box) |
| CV Task | Input | Output |
|---|---|---|
| Classification | Entire image | Single label |
| Object Detection | Entire image | Labels + bounding boxes |
| Segmentation | Entire image | Pixel-level labels |
Section 11: Common Mistakes Students Make in Exams
Mistake 1: Confusing pixel with resolution Many students use these terms interchangeably. They are related but distinct.
- ❌ “Resolution means the pixel value of an image.”
- ✅ “A pixel is the smallest unit of an image. Resolution is the total number of pixels (width × height). Pixel value is the numerical representation of a pixel’s colour.”
Mistake 2: Saying CNNs “see” images like humans do
- ❌ “CNNs see images the same way humans see them.”
- ✅ “CNNs process images as numerical grids. Through multiple layers of convolution, they learn to detect features such as edges, shapes, and textures — enabling them to recognise objects, though the mechanism is fundamentally mathematical, not biological.”
Mistake 3: Leaving out the feature extraction step When asked to describe the CV process, students often jump from “image capture” to “object detection,” skipping feature extraction entirely. Examiners specifically look for this step.
Mistake 4: Mixing up convolution and pooling
- ❌ “Pooling extracts features from the image.”
- ✅ “Convolution extracts features using kernels. Pooling reduces the size of feature maps while retaining important information.”
Section 12: Exam Strategy
Class 10 — Unit 5: Computer Vision (Theory)
Computer Vision is a theory-assessed unit in Class 10 (Code 417). Expect questions in the 2-mark and 4-mark range.
2-mark questions typically ask:
- Define computer vision / pixel / resolution / grayscale / RGB
- State two applications of computer vision
- What is a kernel/filter in image processing?
Model 2-mark answer — “What is a pixel?”
A pixel (picture element) is the smallest unit of a digital image. Each pixel stores a colour value: a single number (0–255) in grayscale images, or three numbers (R, G, B — each 0–255) in colour images.
4-mark questions typically ask:
- Explain the steps of the computer vision process with examples
- Describe the layers of a CNN and the role of each
- Differentiate between grayscale and RGB images with examples
- Explain any two applications of computer vision
Model 4-mark answer structure — “Explain the layers of a CNN”: Write a brief intro sentence (1 line), then name and explain each layer in 2–3 lines with one example per layer. Do not write long paragraphs — use structured points.
Class 12 — Unit 3: Making Machines See (6 marks theory)
Class 12 Computer Vision carries 6 theory marks. Questions will test conceptual depth, not just definitions.
6-mark questions may ask:
- Describe the computer vision process with a labelled diagram
- Explain how a CNN works — include architecture and the role of each layer
- Discuss challenges of computer vision with examples
- Compare traditional computer vision with deep-learning-based approaches
- Explain two real-world applications of computer vision and associated ethical concerns
Exam tip: For a 6-mark answer, write an introduction, explain 3 main points in depth (2 marks each), and end with a conclusion or example. Always name the challenge or application specifically — do not write vaguely.
Try It Yourself — CBSE Activities
Your CBSE syllabus specifies several hands-on activities for this unit. Each one can be included in your practical file.
Activity 1: Emoji Scavenger Hunt (Class 10)
Link: https://emojiscavengerhunt.withgoogle.com/
A Google experiment where you hunt for real-world objects matching emojis — your phone camera identifies objects in real time using computer vision.
Steps:
- Open the link on your phone or tablet.
- The app shows you an emoji (e.g., a coffee cup). Find the real object in your environment.
- Point your camera at it. The CV model identifies whether it matches.
- Note which objects were identified correctly and which were not.
- Observe: What types of objects did the model struggle with? Poor lighting? Unusual angles?
- Document for practical file: Screenshot your score and write 3–4 sentences on your observations about what the model got right and wrong, and why.
Activity 2: RGB Calculator (Class 10)
Link: https://www.w3schools.com/colors/colors_rgb.asp
Steps:
- Open the RGB calculator.
- Set Red=255, Green=0, Blue=0. Note the colour produced.
- Experiment with different combinations and record the colour produced for each.
- Try to recreate the colour of your school uniform or the Indian flag’s saffron and green.
- Document for practical file: Create a small table with your R, G, B values and the resulting colour for at least 6 combinations.
Activity 3: Create Your Own Pixel Art (Class 10)
Link: www.piskelapp.com
Steps:
- Open Piskel and create a new 16×16 canvas.
- Draw a simple image — a letter, a face, or a shape — using the fill tool.
- Change your canvas to 8×8 and recreate the same image. Notice the loss of detail.
- Export and save both versions.
- Document for practical file: Include both images side by side with a note explaining why the 8×8 version has less detail (fewer pixels = lower resolution).
Activity 4: Explore Convolution Kernels (Class 10)
Link: http://setosa.io/ev/image-kernels/
Steps:
- Open the interactive convolution visualiser.
- Try the “Edge Detection,” “Sharpen,” and “Blur” kernels. Observe how each transforms the sample image.
- Note the kernel values for each filter (the 3×3 grid of numbers).
- Document for practical file: Include a screenshot of two different kernel effects with a 2–3 sentence explanation of what each kernel does to pixel values.
Activity 5: Binary Art (Class 12)
(See the detailed Class 12 callout in Section 2 above)
Quick Revision Box
| Term | One-Line Definition |
|---|---|
| Computer Vision | A field of AI that enables machines to interpret and understand visual information |
| Pixel | The smallest unit of a digital image, represented as a numerical value |
| Resolution | The total number of pixels in an image (width × height) |
| Pixel Value | A number (0–255) representing a pixel’s brightness or colour intensity |
| Grayscale | An image with one channel per pixel; 0 = black, 255 = white |
| RGB | A colour model using three channels (Red, Green, Blue), each 0–255 |
| Feature Extraction | The process of identifying meaningful patterns (edges, shapes) in an image |
| Kernel / Filter | A small grid of numbers applied to an image to detect specific features |
| Convolution | A mathematical operation that slides a kernel across an image to produce a feature map |
| Feature Map | The output of applying a convolution — a grid showing where a feature appears |
| CNN | Convolutional Neural Network — a deep learning model designed for image processing |
| Pooling | A CNN layer that reduces feature map size while retaining important information |
| ReLU | Activation function that replaces negative values with zero; introduces non-linearity |
| Object Detection | A CV task that identifies and locates objects within an image |
| Image Segmentation | A CV task that labels every pixel according to the object it belongs to |
| OpenCV | An open-source Python library for computer vision tasks (For Advanced Learners) |
Practice Questions
Question 1 (2 marks): What is the difference between a grayscale image and an RGB image in terms of pixel representation?
Model Answer: A grayscale image stores each pixel as a single value between 0 (black) and 255 (white), representing brightness only. An RGB image stores each pixel as three values — one each for Red, Green, and Blue channels — each ranging from 0 to 255. A grayscale image uses one-third the storage space of a colour image of the same dimensions.
Question 2 (4 marks): Describe the role of the convolution layer and the pooling layer in a Convolutional Neural Network.
Model Answer: A Convolutional Neural Network uses specialised layers to process images efficiently.
Convolution Layer: The convolutional layer applies a kernel — a small grid of numbers — across the input image. At each position, it multiplies the kernel values by the corresponding pixel values and sums the results to produce a single output. As the kernel slides across the entire image, it produces a feature map that highlights where specific features (such as edges or curves) appear. A CNN uses multiple kernels simultaneously, producing multiple feature maps that capture different visual patterns.
Pooling Layer: After convolution, the pooling layer reduces the size of the feature maps. Max pooling — the most common type — divides the feature map into small regions and keeps only the maximum value from each region. This reduces computational load, makes the model more efficient, and makes the feature detection more robust to small variations in the position of objects within the image.
Together, these two layers allow a CNN to progressively learn complex visual features from simple edges to complete objects — without the engineer needing to define what those features look like.
Question 3 (MCQ): Which of the following correctly describes the purpose of the feature extraction step in the computer vision process?
(a) To capture an image using a camera or sensor (b) To resize and clean the image before processing (c) To identify meaningful patterns such as edges and shapes in the image (d) To assign a final label or output to the analysed image
Answer: (c) — Feature extraction identifies meaningful patterns (edges, shapes, textures) in the image that help the model understand what it contains.
FAQ
Q1: Is computer vision only about face recognition?
No. Face recognition is one application of computer vision, but the field is much broader. Computer vision tasks include image classification, object detection, image segmentation, optical character recognition (OCR), medical image analysis, satellite imagery interpretation, agricultural disease detection, and much more. Face recognition is the application students encounter most often in daily life, which is why it gets the most attention — but it represents a small slice of what computer vision can do.
Q2: What is the difference between computer vision and image processing?
Image processing refers to operations that transform an image — resizing, sharpening, denoising, or colour conversion. These are mathematical operations that produce a modified image as output. Computer vision goes further: it interprets what is in the image and produces meaningful information as output (a label, a count, a location). Image processing is often a preprocessing step within a computer vision pipeline. In simple terms: image processing changes an image; computer vision understands it.
Q3: My Class 10 syllabus mentions “no-code AI tools” for computer vision. Do I need to know how to code for this?
No. Your Class 10 Computer Vision unit is explicitly designed to be accessible without coding. Tools like Teachable Machine, Lobe.ai, and Orange Data Mining allow you to collect data, train a model, and test predictions entirely through drag-and-drop interfaces. Your practical exam in Class 10 will assess your ability to use these tools and interpret results — not to write Python code. Code-based CV (using OpenCV, TensorFlow, etc.) is a Class 12 Advanced Learners extension and is not evaluated in any exam.
Q4: Why does the CBSE syllabus include the convolution operator if I am not expected to write code?
The convolution operator is included because it is the foundational mechanism behind how machines extract meaningful information from images — the “how” of computer vision. Understanding convolution helps you answer exam questions about CNNs intelligently, rather than just memorising layer names. You are expected to understand the concept (what a kernel does, what a feature map is) and be able to use the interactive convolution tool (setosa.io) — not to implement convolution in Python. Think of it the same way you understand how a car engine works conceptually without needing to build one.
Q5: Can I build a career in computer vision after Class 12?
Yes — and it is one of the most in-demand specialisations in AI right now. Computer vision engineers work on applications ranging from autonomous vehicles to medical diagnostics to satellite image analysis. In India, companies like Ola, Agnikul Cosmos, TCS, Infosys, and numerous healthtech startups actively hire CV specialists. The typical path is: Class 12 AI → B.Tech (CS/AI) or B.Sc. AI → specialisation through online courses (Coursera, fast.ai, PyTorch tutorials) → internship or research project. The foundations you are building now — understanding pixels, convolution, CNN architecture, and no-code tools — are the starting point for this career path.
Action Plan
✅ Exam Practice Checklist
- [ ] I can define computer vision, pixel, resolution, pixel value, grayscale, and RGB clearly in one sentence each
- [ ] I can draw and label the five steps of the computer vision process
- [ ] I can explain the four main layers of a CNN (Convolution, ReLU, Pooling, Fully Connected) with the role of each
- [ ] I can explain what a convolution kernel does and what a feature map represents
- [ ] I can name four real-world applications of computer vision with one India-specific example
- [ ] I can state three challenges of computer vision with brief explanations
- [ ] I have completed at least two CBSE practical activities and documented them in my practical file
🔧 Interactive Tools
Your CBSE syllabus specifies these tools for this unit — use them before your practical exam:
- Emoji Scavenger Hunt: emojiscavengerhunt.withgoogle.com
- RGB Calculator: w3schools.com/colors/colors_rgb.asp
- Pixel Art: piskelapp.com
- Convolution Kernels: setosa.io/ev/image-kernels/
- Teachable Machine: teachablemachine.withgoogle.com
💡 Project Idea: Smart Waste Sorter Using Teachable Machine
What you will build: A model that classifies waste images as recyclable or non-recyclable using your webcam.
Step 1: Open Teachable Machine. Create two classes: “Recyclable” (plastic bottles, paper, cardboard) and “Non-Recyclable” (food waste, broken items). Collect 40–50 images per class using your webcam.
Step 2: Train the model. Test it with new objects and note the accuracy.
Step 3: Screenshot the training summary and prediction outputs. Write a 200-word project report: what the model learned, where it succeeded, and where it struggled — and explain why (lighting, angle, object variety).
This project directly addresses SDG 12 (Responsible Consumption) and can be the centrepiece of your Class 10 practical file.
Last updated: April 2026 | CBSE AI Syllabus 2025–26 | Class 10 (Code 417) Unit 5 + Class 12 (Code 843) Unit 3